English
  中文
中文  日本語
日本語  한국어
한국어  français
  Deutsch
  Español
  русский
  português
  العربية
  ไทย
ไทย  हिंदी
हिंदी CLOSE
Digital Force Gauge
Torque Tester
Coating Thickness Gauge
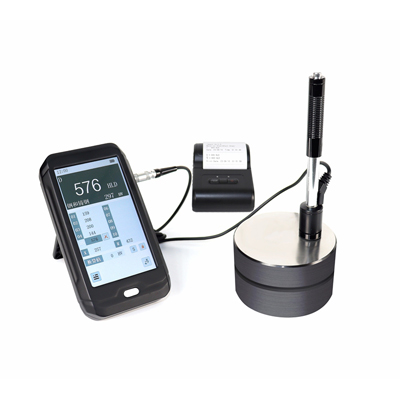
Digital Portable Hardness Tester
Digital Height Gauge
Digital Microscope
Test Stand
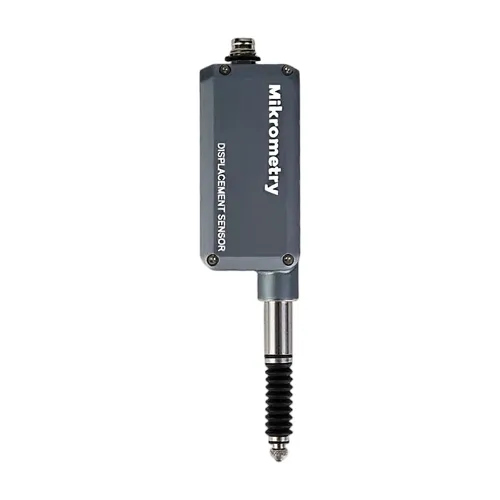
Contact Displacement Sensor
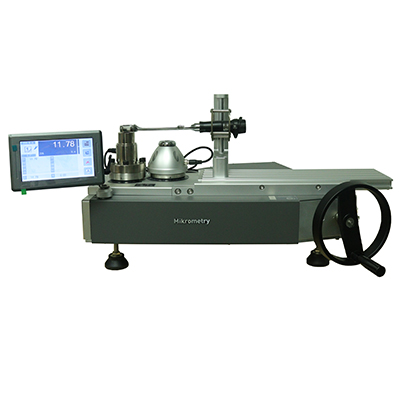
Altimeter Measurement Machine
Open Optical Encoder
How Does A Paint Thickness Meter Work?
How To Use A Force Gauge
How To Use Push Pull Gauge
Handheld Bottle Cap Torque Tester
The Ultimate Guide to Precision Testing: Coating Thickness, Spring Force, and Torque Analysis
Correct Use Method of Digital Force Gauge
How to Select Thickness Gauge? One Step Here to Find the Most Appropriate Thickness Gauge!
Precautions for the Use of Digital Force Gauge
Detection Principle and Classification of Thickness Gauges
What is the Selection Index of Pull Force Meter?
How to Use Rubber Shore Hardness Gauge Properly?
What Should Be Paid Attention to when Using the Leeb Hardness Tester?
How to Choose the Suitable Leeb Hardness Tester?
Precautions and Maintenance Methods for Coating Thickness Meter
Standard Features of Leeb Hardness Tester
How to Use the Coating Thickness Meter?
What is the Coating Thickness Instrument?
The Difference Between the Principle of Magnetic Measurement and the Principle of Eddy Current Measurement of Coating Thickness Meter
How to Keep the Accuracy of Force Gauge Push Pull
Precautions in Using Coating Thickness Meter
Common Fault Analysis of Digital Push Pull Force Gauge
The Role of a Torque Gauge Meter
Main Features of Torque Tester
Torque Tester Maintenance Tips
Matters Needing Attention when Purchasing Paint Coating Thickness Gauge Meter
Factors That Cause Inaccurate Measurement of Coating Thickness Gauge
How to Use Paint Thickness Gauge
What Are the Applicable Industries of Push Pull Force Gauge?
Characteristics and Categories of Force Metre
Classification of Hardness Test Meters
What Are the Benefits of Coating Thickness Instrument for Product Coating Quality?
Precautions for Using a Force Meter
The Electroplating Factory Measures the Coating Thickness by Coating Thickness Instrument
How to Handle the Improper Operation of Force Gauge Push Pull?
What Functions Should a Good Leeb Hardness Tester Have?
Basic Principles and Standards of Eddy Current Digital Coating Thickness Gauge Technology
Application of Leeb Hardness Tester Test in Industrial Production
What Will Affect the Measurement Accuracy of the Leeb Hardness Tester?
How to Choose a Portable Coating Thickness Instrument?
Measuring Methods of the Thickness Measuring Gauge and Its Advantages and Disadvantages
Metrology Calibration and Maintenance of Leeb Hardness Tester
Introduction to the Functions and Features of the External Force Gauge Push Pull
Notes and Classification of Shore Hardness Tester
The Method and Development of the Bottle Cap Torque Tester
Types of Coating Thickness Gauges and Standardized Operation for Measuring Film Thickness
Operation Precautions and Maintenance of Portable Leeb Hardness Tester
How to Correctly Apply the Leeb Hardness Test Technology?
The Characteristics and Application of Leeb Hardness Tester
Calibration Steps for Hardness Testers
Operation Steps of Digital Push-pull Gauge and Its Correct Use
Technical Principle of Coating Thickness Meter
How to Use a Force Gauge Safely?
Application of Coating Thickness Gauge in Plastic Industry
Use of Digital Force Meters
What Are the Main Functions of Each Part of the Shore Hardness Tester Verification Device?
Enhancing Quality Control with Hardness Testers and Cap Torque Testers: A Comprehensive Guide
The Power of Precision: Exploring the Benefits of Digital Push Pull Force Gauges
How to Use the Shore Tester
Factors Affecting Product Measurements with Leeb Hardness Tester
Torque on the Go: The Portable Advantages of Handheld Torque Meters
Calibrated Control: The Importance of Accuracy in Handheld Torque Meter Readings
Precision in Construction: Handheld Torque Meters for Building Stability
Microscale Marvels: The Impact of Mikro Testers in Nanotechnology
Powering Up: Handheld Torque Meters in Renewable Energy Installations
Fast and Accurate: How Mikro Testers Revolutionize Quality Assurance
On the Cutting Edge: Digital Thickness Measuring Instruments in Industrial Blade Manufacturing
Small but Mighty: The Applications of Mikro Testers in Medical Devices
Beyond the Surface: Mikro Testers in Material Science and Analysis
Fueling Efficiency: Digital Thickness Measurement in Automotive Components
Maintain Accuracy with Proper Calibration of Handheld Bottle Cap Torque Testers
Factors to Consider When Purchasing a Handheld Bottle Cap Torque Tester
The Power of Handheld Bottle Cap Torque Testers
Tips for Troubleshooting Common Issues with Handheld Bottle Cap Torque Testers
How Aluminum Screw Cap Torque Testers Ensure Integrity
Features and Specifications of an Aluminum Screw Cap Torque Tester
Tips for Selecting the Right Aluminum Screw Cap Torque Tester
The Importance of Using a Digital Aluminum Screw Cap Torque Tester
How to Use a Force Gauge: A Comprehensive Guide
Push Force Meters vs. Pull Force Meters: Key Differences
Top Applications of Push Force Meters in Industry
How to Choose the Right Push Force Meter for Your Needs
Force Meter: A Versatile Tool for Precision Measurement
Principles and Process of Thickness Paint Measurement
Thickness Measuring Instrument: A New Technological Revolution
Knowledge of Thickness Gauge Measurement Instruments
Digital Paint Coating Thickness Gauge Meter: Working Principle and Precautions
How to Choose the Right Torque Gauge Meter?
Types and Overview of Push Pull Force Meter
Hardness Measuring Devices: The Complete Guide for Industrial Applications
Pull Force Meters: A Complete Guide to Measurement Solutions
The Ultimate Guide to Digital Paint Coating Thickness Gauge Meters
Understanding Force Meters: A Complete Guide
Expanding Applications of Digital Push-Pull Gauge in Modern Industries
Installation and Maintenance Guide for Bottle Cap Torque Tester
Understanding the Leeb Hardness Test: Precision and Versatility in Material Inspection
DoHP100 Portable Leeb Hardness Measuring Instrument: Precision and Portability from Mikrometry
Automotive Paint Inspection: The Role of Paint Thickness Measuring Devices
Hardness Measuring Instrument: Precision Solutions from Mikrometry
The Reliable Partner for Electronic Component Connection Testing: Push Pull Tester From Mikrometry
How a Bottle Cap Torque Tester Enhances Mechanical Precision
Digital Thickness Gauge Meter: Precision in Industrial Thickness Measurement
Understanding the Working Principle of a Digital Thickness Gauge Meter
How to Use a Hand Force Gauge Effectively?
The Role of a Handheld Torque Meter in Modern Industry
Mastering the Use of a Metal Thickness Tester for Precision Measurement
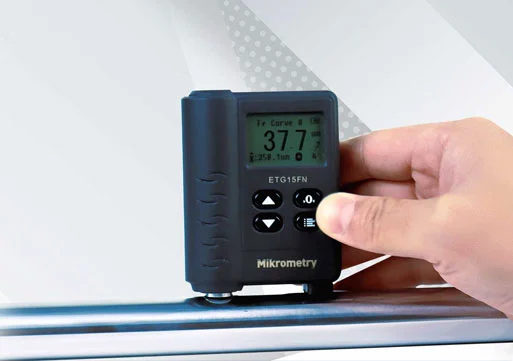
The ETG15FN Coating Thickness Gauge: Compact Body, Measurement King
The Main Uses and Maintenance of a Digital Push Pull Gauge
Digital Height Gauge: Empowering Smart Manufacturing with Precision
How to Choose the Right Portable Hardness Tester for Aluminum?
The Advantages of Digital Torque Indicators in Mechanical Manufacturing
Bottle Torque Meter: Technological Innovation Enhancing Testing Efficiency
CLOSE
Search